Adobe InDesign is increasingly becoming an AI-assisted design and publishing tool.
For beginners, that can be both exciting and confusing.
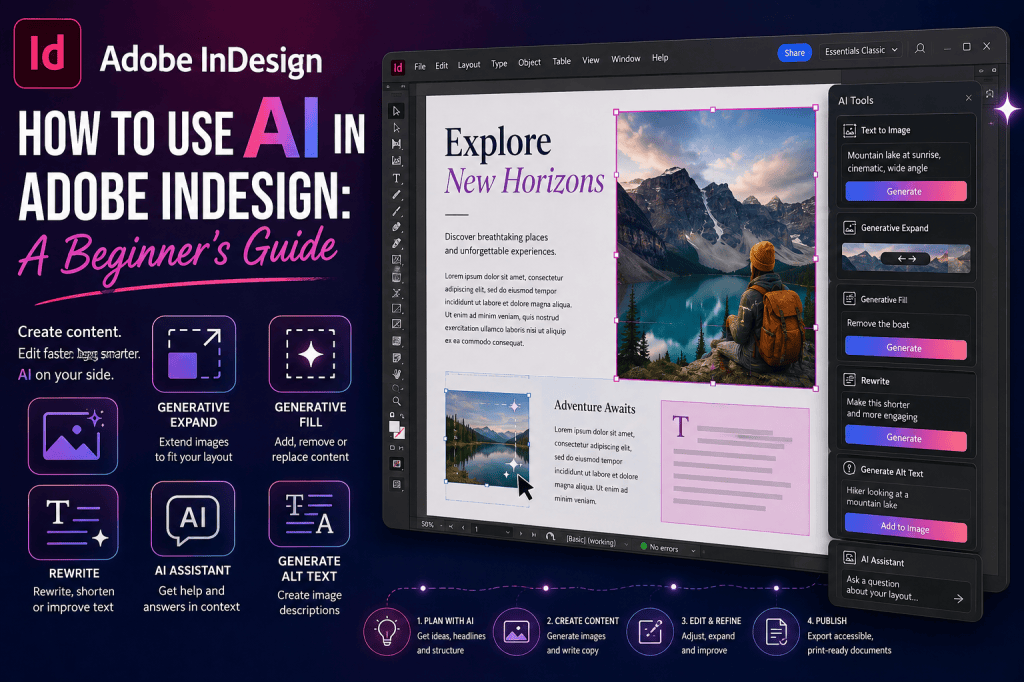
You may see features such as Text to Image, Generative Expand, Generative Fill, Rewrite, Generate Alt Text, and AI Assistant and wonder:
Where should I actually start?
This guide focuses on exactly that.
Instead of covering every possible AI workflow in depth, it shows how a beginner can start using AI in Adobe InDesign in a practical, manageable way.
By the end, you should understand:
- which AI tools are available;
- what each tool is best suited for;
- where to find them;
- how to use them in a real document;
- when to use AI;
- and when traditional InDesign tools are still the better choice.
What Does AI Mean in Adobe InDesign?
AI in Adobe InDesign refers to a growing group of features that use artificial intelligence to help with content creation, image editing, copy refinement, accessibility, and workflow assistance.
These tools are designed to speed up tasks that traditionally required extra applications or more manual work.
For example, AI can help you:
- generate an image from a text prompt;
- extend an image beyond its original borders;
- add or remove image content;
- rewrite copy;
- shorten text;
- generate image descriptions for accessibility;
- and increasingly interact with InDesign using natural-language instructions.
AI does not replace the core InDesign workflow.
You still create layouts using:
- pages;
- text frames;
- image frames;
- styles;
- grids;
- parent pages;
- layers;
- tables;
- and export settings.
AI simply gives you additional tools inside that workflow.
Step 1: Make Sure You Have a Current Version of InDesign
The first step is to make sure you are using a recent version of Adobe InDesign.
AI features are introduced gradually.
Some may appear in the standard release, while others may first appear in Beta.
If you are using an older installation, certain AI tools may not be available.
Open the Creative Cloud desktop application and check whether an InDesign update is available.
You should also verify that:
- you are signed into your Adobe account;
- your subscription is active;
- your internet connection is working;
- and your language or region supports the feature you want to use.
Some generative AI functions depend on Adobe’s cloud services.
Step 2: Start with a Simple InDesign Document
You do not need a complex project to learn InDesign AI.
Create a simple document.
For example:
- A4 or Letter;
- two pages;
- one headline;
- one image frame;
- one body-text frame.
This gives you a safe environment for experimentation.
A good beginner project is a simple magazine spread.
You can use AI to:
- generate an image;
- extend the image;
- write or shorten copy;
- generate alt text.
That covers several of the most important AI workflows without making the document unnecessarily complicated.
Step 3: Try Text to Image
Text to Image is one of the easiest AI features to understand.
Instead of importing an existing image, you describe the type of image you want.
For example:
Modern creative studio with natural daylight, editorial photography, minimalist interior, wide composition.
InDesign can use the prompt to generate image options.
This can be useful for:
- concept layouts;
- mockups;
- editorial illustrations;
- placeholder images;
- brochure graphics;
- and early-stage visual exploration.
The most important beginner lesson is this:
Prompt quality affects output quality.
A vague prompt gives the AI very little direction.
Compare:
Office.
with:
Bright Scandinavian-style design studio with large windows, neutral interior, natural morning light, wide editorial composition with empty space on the left for headline text.
The second prompt specifies:
- environment;
- style;
- lighting;
- composition;
- and intended layout use.
That usually produces a more useful result.
Beginner Prompt Formula
A simple prompt formula is:
Subject + style + lighting + composition + purpose
For example:
Mountain cabin, premium travel photography, golden-hour lighting, wide landscape composition, empty space on the right for brochure text.
This formula is easy to remember and works well for publication design.
Step 4: Try Generative Expand
Generative Expand is particularly useful because it solves a very common InDesign problem.
Your image does not fit your frame.
Imagine you have a vertical image, but your layout requires a wider horizontal composition.
Without AI, you might:
- open the image in Photoshop;
- increase the canvas;
- recreate the missing background;
- save another file;
- return to InDesign.
Generative Expand can potentially create that extra image area directly in the layout workflow.
This is useful when:
- extending sky;
- extending walls;
- extending backgrounds;
- creating additional space around a subject;
- adapting portrait images to landscape frames;
- and producing additional room for typography.
For beginners, this is one of the best AI tools to learn first because the benefit is immediately visible.
Step 5: Use Generative Fill for Small Image Changes
Generative Fill allows you to modify parts of an image with AI.
Depending on the current InDesign release and feature availability, you may be able to use it to:
- remove distracting objects;
- add visual elements;
- replace selected content;
- or modify part of an image.
For example, imagine you are designing a brochure and a photograph contains an object that distracts from the headline.
Instead of rebuilding the entire image in Photoshop, you may be able to select the unwanted area and generate a replacement.
For beginners, keep your first experiments simple.
Try removing one small object before attempting a major image transformation.
AI usually performs better when you give it a clear, limited task.
Step 6: Use Rewrite for Text
AI in InDesign is not limited to images.
Text is equally important.
Rewrite can help you modify existing copy.
Potential uses include:
- shortening a paragraph;
- making text more formal;
- making text more conversational;
- simplifying wording;
- expanding brief copy;
- or generating another version.
Imagine you have a paragraph that does not fit the available text frame.
Rather than decreasing font size immediately, you could use AI to shorten the text.
For example:
Original:
Our company provides innovative technology solutions designed to help businesses improve operational efficiency and achieve sustainable long-term growth.
Shorter version:
We provide technology solutions that improve efficiency and support long-term growth.
The meaning remains broadly similar while the copy occupies less space.
Step 7: Use AI to Solve Overset Text
Overset text is one of the most common InDesign problems.
It means that a text frame contains more text than it can display.
AI can help in some situations.
Before AI, common solutions included:
- increasing the frame size;
- decreasing font size;
- reducing leading;
- adjusting tracking;
- deleting text;
- or editing copy manually.
AI provides another option:
rewrite the copy to fit the available space.
This can be especially useful for:
- captions;
- short descriptions;
- pull quotes;
- product copy;
- brochure text;
- and marketing blocks.
However, do not automatically let AI alter important legal, technical, or carefully approved copy.
Always review the result.
Step 8: Generate Alt Text
If you create accessible PDFs or EPUB publications, image descriptions are important.
InDesign can use AI to generate suggested alt text for images.
For example, an image might be described as:
Woman using a laptop at a desk near a large window.
That gives you a useful starting point.
But AI-generated alt text should be reviewed.
Why?
Because alt text depends on context.
Suppose the same image appears in two different documents.
In a business article, the relevant description might emphasize remote work.
In an interior-design publication, the relevant description might emphasize the room.
The pixels are the same.
The communication purpose is different.
AI cannot always determine that perfectly.
Step 9: Try the AI Assistant
Adobe is also moving toward conversational interaction with InDesign.
The idea is straightforward:
Instead of knowing exactly which command to use, you describe what you want.
For beginners, this could become particularly useful because InDesign is a powerful application with many menus and panels.
A beginner might ask:
How do I add page numbers?
or:
How can I make the selected headline larger?
or:
How do I create a text frame?
This type of interaction can reduce the learning curve.
However, AI assistance should supplement your understanding of InDesign rather than replace it completely.
The more you understand:
- styles;
- layout structure;
- typography;
- parent pages;
- frames;
- and export settings,
the better you will be able to judge the AI’s recommendations.
Step 10: Use AI for Ideas, Not Just Execution
One mistake beginners make is thinking AI is only useful for generating final content.
It can also be useful during the planning stage.
For example, you can use AI to brainstorm:
- magazine themes;
- headline alternatives;
- page structures;
- brochure sections;
- article summaries;
- color-direction ideas;
- visual styles;
- image concepts;
- and content hierarchy.
Imagine you are creating a six-page travel brochure.
You could ask AI to suggest a structure such as:
- cover;
- destination introduction;
- highlights;
- activities;
- accommodation;
- contact and booking information.
You still make the final design decisions.
AI simply helps accelerate early planning.
A Simple Beginner AI Workflow
Here is a practical first project.
Project: Create a Two-Page Travel Magazine Spread
Step 1 — Create the document
Create a two-page spread.
Step 2 — Add a headline
For example:
Explore the Norwegian Fjords
Step 3 — Generate an image
Use Text to Image with a prompt such as:
Dramatic Norwegian fjord at sunrise, editorial travel photography, cinematic natural light, wide composition, room for headline typography.
Step 4 — Place the image
Use it across one page or across the spread.
Step 5 — Expand if necessary
If the image does not fit the frame, try Generative Expand.
Step 6 — Add body copy
Write a short introduction.
Step 7 — Shorten the copy
If the text is too long, use Rewrite to create a shorter version.
Step 8 — Generate alt text
Create an AI-assisted image description.
Step 9 — Review everything
Check:
- image quality;
- wording;
- typography;
- accessibility;
- alignment;
- and composition.
This simple project introduces you to several AI features while keeping the workflow manageable.
When Should You Use AI in InDesign?
AI is most useful when it removes repetitive or low-value manual work.
Good examples include:
- generating visual concepts;
- extending backgrounds;
- shortening non-critical copy;
- creating first-draft alt text;
- generating placeholder imagery;
- brainstorming alternatives;
- and accelerating repetitive production.
AI is less appropriate when:
- text must remain legally exact;
- brand wording has already been approved;
- images require precise factual accuracy;
- client confidentiality is involved;
- accessibility requires nuanced human judgment;
- or production requirements are highly specific.
AI should support your design judgment.
It should not replace it.
Common Beginner Mistakes
Mistake 1: Writing Vague Prompts
Bad:
Beach.
Better:
Tropical beach at sunrise, premium travel photography, soft natural light, wide landscape composition with empty space for brochure headline.
Mistake 2: Accepting the First Result
Generate alternatives.
AI output is exploratory.
The first result is not necessarily the best one.
Mistake 3: Trusting AI Copy Without Review
Always check:
- facts;
- grammar;
- tone;
- names;
- dates;
- terminology;
- and meaning.
Mistake 4: Using AI When a Normal InDesign Tool Is Faster
Not every problem requires AI.
If you only need to:
- move an object;
- change a font;
- adjust spacing;
- resize a frame;
- or apply a paragraph style,
traditional InDesign tools are usually faster.
Mistake 5: Ignoring Accessibility
Generated images and AI-modified content should still be accessible when necessary.
AI does not remove accessibility responsibilities.
AI Does Not Replace InDesign Skills
This is especially important for beginners.
AI may help you produce content faster, but professional InDesign work still requires knowledge of:
- typography;
- visual hierarchy;
- grids;
- alignment;
- paragraph styles;
- character styles;
- object styles;
- parent pages;
- color;
- image resolution;
- bleed;
- preflight;
- PDF export;
- and accessibility.
If an AI tool generates a bad result, you need enough design knowledge to recognize it.
That is why learning traditional InDesign skills remains valuable.
Should Beginners Learn Traditional InDesign or AI First?
Learn both, but start with the fundamentals.
A good sequence is:
- learn frames;
- learn text;
- learn image placement;
- learn styles;
- learn parent pages;
- learn export;
- then add AI to the workflow.
If you learn AI without understanding the basics, you may be able to generate content but struggle to build a professional publication.
If you understand the basics first, AI becomes a productivity layer.
What About ChatGPT?
ChatGPT can also support InDesign beginners.
It can help explain:
- InDesign terminology;
- GREP;
- scripting;
- styles;
- data merge;
- typography;
- workflow problems;
- error messages;
- and publishing concepts.
For example, you could ask:
Explain paragraph styles in Adobe InDesign like I’m a beginner.
or:
Write an InDesign GREP expression that finds email addresses.
or:
Why does my InDesign image look blurry?
This makes external AI assistants particularly useful as learning tools.
InDesign AI and Generative Credits
Some generative AI features may use Adobe generative credits.
The exact number of credits available depends on factors such as:
- your Adobe plan;
- feature;
- model;
- account;
- and Adobe’s current policies.
If you only use generative AI occasionally, this may not have much effect on your workflow.
If you generate large numbers of images, it becomes more important.
Always check Adobe’s current plan details because generative-credit policies can change.
Is InDesign AI Included in Adobe InDesign?
AI capabilities are increasingly integrated into Adobe’s existing applications and subscription ecosystem.
However, feature availability can vary.
You should check:
- your InDesign version;
- your Adobe plan;
- whether the feature is Beta;
- regional availability;
- and any generative-credit requirements.
[AFFILIATE LINK OPPORTUNITY #1]
Want to Try Adobe InDesign?
If you want to follow the AI workflows in this tutorial, you can explore Adobe InDesign and the latest available plans directly from Adobe.
→ View Adobe InDesign plans and offers
Affiliate link: https://prf.hn/l/xEeRg3n/
What Should You Learn Next?
After you become comfortable with the basics, the best next step is to explore individual AI features in more depth.
Start with:
- Adobe InDesign Text to Image;
- Generative Expand;
- Generative Fill;
- Rewrite;
- Generate Alt Text;
- and AI Assistant.
You can then move into more advanced areas such as:
- AI-assisted GREP;
- scripting;
- Data Merge;
- document automation;
- accessibility;
- translation;
- and catalog production.
Final Thoughts
Using AI in Adobe InDesign does not require you to become an AI expert.
Start with one useful task.
Generate an image.
Extend a background.
Shorten a paragraph.
Create draft alt text.
Ask the AI Assistant for help.
Then gradually add more AI-assisted steps to your workflow where they actually save time.
The most effective approach is not:
Use AI everywhere.
It is:
Use AI where it improves speed without reducing design quality.
For beginners, that is the best way to approach InDesign AI in 2026.
[AFFILIATE LINK OPPORTUNITY #2 — PRIMARY CTA]
Start Creating with Adobe InDesign
Explore professional page-layout tools together with Adobe’s growing set of AI-assisted creative features.
→ Get Adobe InDesign
Affiliate link: https://prf.hn/l/xEeRg3n/
Continue the InDesign AI Series
Next recommended guides:
- Adobe InDesign AI Features: Everything You Can Do with Generative AI
- Adobe Firefly in InDesign: How the Integration Works
- Adobe InDesign AI Assistant: A Complete Guide
- Adobe InDesign Text to Image: A Complete Guide
- Adobe InDesign Generative Expand: A Complete Guide
- Adobe InDesign Generative Fill: A Complete Guide
- Adobe InDesign Rewrite: How to Generate and Rewrite Text with AI
- InDesign AI Alt Text: How to Automatically Generate Image Descriptions