Finding the right image for an InDesign layout has traditionally meant searching stock libraries, commissioning photography or illustration, creating artwork yourself, or moving between InDesign and other creative applications.
Generative AI introduces another option.
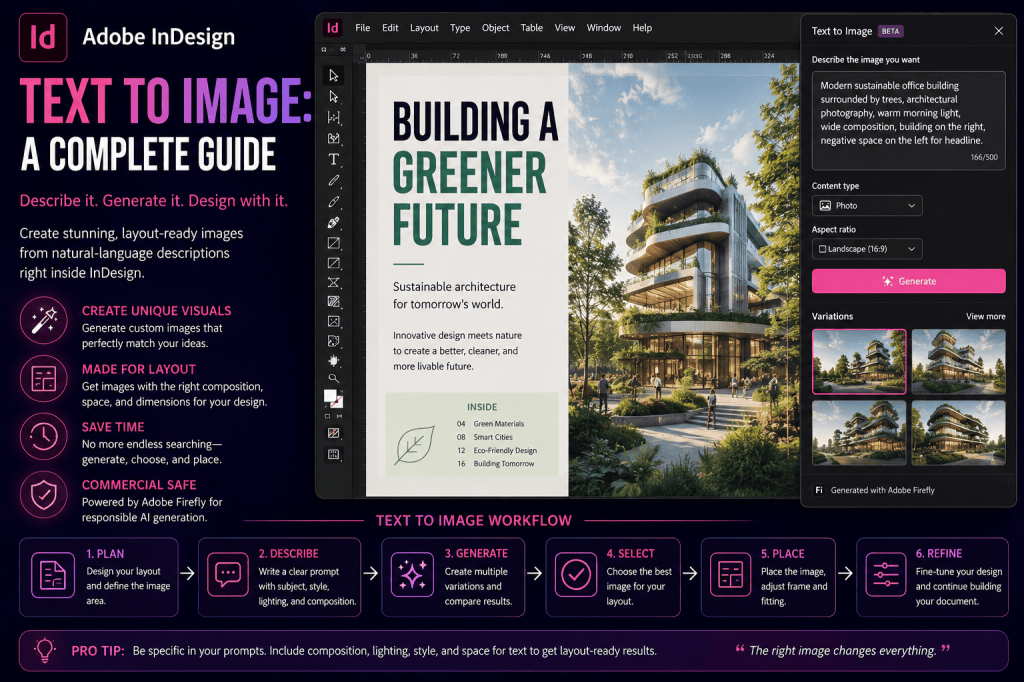
With Text to Image in Adobe InDesign, designers can generate visual content from a written description and use the result directly within a page-layout workflow.
Instead of searching for an image that happens to fit your design, you can describe the image you need.
For example:
Modern sustainable office building surrounded by trees, premium architectural photography, warm morning light, wide composition, building positioned on the right with negative space on the left for headline text.
The distinction is important.
You are not merely asking AI to create an attractive image.
You are asking it to create an image for a specific layout.
That makes Text to Image particularly interesting for magazine designers, marketers, publishers, brochure designers, and anyone producing visual documents in Adobe InDesign.
This complete guide explains how Text to Image works, how to write better prompts, how to generate images around your layouts, where the feature is useful, and where generative imagery should be avoided.
What Is Text to Image in Adobe InDesign?
Text to Image is a generative AI capability that creates images from natural-language descriptions.
You enter a prompt describing what you want.
The generative AI model interprets the prompt and creates visual alternatives.
The basic workflow is:
Describe
↓
Generate
↓
Compare
↓
Select
↓
Place
↓
Refine
Instead of beginning with an existing photograph or illustration, the workflow begins with an idea.
How Text to Image Changes the Traditional InDesign Workflow
InDesign has traditionally been primarily an assembly environment.
You create or acquire assets elsewhere and then place them into the document.
A conventional image workflow might look like this:
Determine image requirement
↓
Search Adobe Stock or another image library
↓
Find possible images
↓
License/download
↓
Place in InDesign
↓
Crop
↓
Discover composition problem
↓
Search again or edit in Photoshop
Text to Image creates another possibility:
Determine image requirement
↓
Create image frame
↓
Describe the required image and composition
↓
Generate alternatives
↓
Choose the best result
↓
Continue designing
This does not eliminate stock photography or Photoshop.
It simply adds another route to obtaining visual content.
Why Text to Image Is Particularly Useful in InDesign
There are many AI image generators.
So why does image generation matter specifically inside a page-layout application?
Because the layout already exists.
The designer knows:
- the dimensions of the image area;
- where the headline will appear;
- where the subject should be positioned;
- how much negative space is required;
- whether the page is portrait or landscape;
- and how the image interacts with other elements.
That context can influence the prompt.
You can therefore generate imagery around the page instead of designing the page around whatever imagery you happen to find.
Layout-First Image Generation
This is perhaps the most important concept in this guide.
Traditional workflow:
Find image → adapt layout
Generative workflow:
Create layout → generate image for layout
Suppose your magazine spread has:
- headline on the left;
- body copy below the headline;
- image covering the right half of the spread.
You need the main subject on the right.
A generic prompt might be:
Woman working in a modern creative studio.
That could place the subject anywhere.
A layout-aware prompt would be:
Female designer working in a modern creative studio, editorial photography, soft natural daylight, subject positioned on the right side, wide horizontal composition, uncluttered negative space on the left for magazine headline and introductory copy.
Now the prompt reflects the actual design.
How to Use Text to Image in InDesign
The exact interface can change as Adobe develops InDesign, but the general workflow is straightforward.
Step 1 — Create Your Document
Start with your InDesign document.
This might be:
- magazine;
- brochure;
- report;
- advertisement;
- book;
- catalog;
- poster;
- flyer;
- newsletter;
- or presentation-style publication.
Build enough of the layout to understand the image requirement.
Step 2 — Create the Image Area
Define where the generated image needs to appear.
The frame itself gives you useful information.
Ask:
- Is the frame portrait or landscape?
- Is it a full-page image?
- Is it a narrow column image?
- Is it a double-page hero?
- Where will typography overlap?
- Where should the main subject appear?
Do this before writing the prompt.
Step 3 — Decide What the Image Must Communicate
Do not begin with visual style.
Begin with purpose.
Ask:
What should this image communicate to the reader?
For example, an article about remote work might require:
Professional working comfortably from a home office.
An article about sustainable architecture might require:
Modern low-carbon office building integrated with nature.
A travel article might require:
Sense of adventure and dramatic landscape.
The communication objective should guide the prompt.
Step 4 — Write Your Prompt
Start with a simple description.
For example:
Modern sustainable office surrounded by trees.
Then improve it:
Modern sustainable office building surrounded by mature trees, contemporary architectural photography, warm morning light.
Then make it layout-aware:
Modern sustainable office building surrounded by mature trees, contemporary architectural photography, warm morning light, building positioned on the right, wide horizontal composition, clean negative space on the left for editorial headline.
Each layer provides more direction.
The Best Prompt Formula for InDesign
A practical formula for publication design is:
Subject + environment + style + lighting + composition + layout requirement
Let’s examine each component.
1. Subject
What is the primary subject?
Examples:
- architect;
- electric vehicle;
- laptop;
- mountain cabin;
- sustainable building;
- chef;
- business team;
- tropical island;
- robot;
- abstract technology network.
Be specific where necessary.
2. Environment
Where is the subject?
Examples:
- modern office;
- city street;
- mountain landscape;
- restaurant kitchen;
- Scandinavian interior;
- tropical coastline;
- industrial factory;
- minimalist studio.
Environment provides context.
3. Visual Style
What should the image look like?
Examples:
- editorial photography;
- commercial photography;
- cinematic photography;
- watercolor illustration;
- minimalist vector illustration;
- technical illustration;
- abstract geometric artwork;
- paper-cut illustration;
- photorealistic architectural visualization.
Style is particularly important when several generated images appear in the same publication.
4. Lighting
Lighting can dramatically change the mood.
Try terms such as:
- soft daylight;
- warm morning light;
- golden-hour lighting;
- dramatic studio lighting;
- diffused natural light;
- bright commercial lighting;
- moody cinematic lighting.
For example:
Modern hotel lobby, premium architectural photography, soft warm evening lighting.
That feels very different from:
Modern hotel lobby, bright natural morning light.
5. Composition
Composition is critical for InDesign.
Useful instructions include:
- wide composition;
- vertical composition;
- centered subject;
- subject on the left;
- subject on the right;
- distant subject;
- close-up;
- eye-level view;
- overhead view;
- large foreground;
- minimal composition.
This is where prompting becomes page-layout aware.
6. Layout Requirement
Tell the AI why you need the composition.
Examples:
- negative space on the left for headline;
- clear sky at top for cover typography;
- uncluttered area on right for body copy;
- centered composition for book cover;
- open lower third for caption;
- minimal background for promotional text.
This is one of the most useful techniques for InDesign users.
Example: Weak vs Strong Prompt
Weak
Mountain.
Better
Dramatic mountain landscape at sunrise.
Strong
Dramatic alpine mountain landscape at sunrise, premium editorial travel photography, warm golden light, wide horizontal composition.
Layout-aware
Dramatic alpine mountain landscape at sunrise, premium editorial travel photography, warm golden light, mountains concentrated on the right side, wide horizontal composition, open sky and negative space on the left for magazine headline.
The final prompt is not necessarily “better AI prompting” in general.
It is better InDesign prompting because it considers the page.
Generate Several Variations
Do not assume the first result will be the best.
Generate alternatives and compare:
- subject position;
- visual balance;
- realism;
- lighting;
- negative space;
- background complexity;
- relationship with typography;
- and overall mood.
AI generation works best as an iterative process.
Think:
Generate → evaluate → refine → regenerate
rather than:
Generate → accept.
Refine the Prompt Based on the Layout
Suppose the image looks good but the subject is too central.
Modify the prompt:
Move the main subject visually toward the right side of the composition and increase negative space on the left.
If the background is too busy:
Minimal uncluttered background with generous negative space.
If the image feels too artificial:
Natural editorial photography, realistic lighting, documentary-style composition.
Prompt refinement should respond to actual layout problems.
Text to Image for Magazine Design
Magazine production is an obvious use case.
Generative imagery can help with:
- conceptual editorial illustrations;
- feature-opening images;
- backgrounds;
- section dividers;
- cover concepts;
- decorative imagery;
- and visual prototypes.
For example:
Futuristic AI-powered city infrastructure, sophisticated editorial illustration, subtle blue and violet palette, wide landscape composition, detailed visual content on the right, negative space on the left for feature headline.
This could work well for a technology magazine.
Text to Image for Magazine Covers
Covers are more demanding because typography needs substantial visual space.
A useful cover prompt might be:
Contemporary female architect standing inside a dramatic modern building, premium editorial portrait photography, subject centered slightly lower in frame, clean architectural background, generous negative space at the top for magazine masthead and cover lines.
Notice that the prompt explicitly reserves space for typography.
That is essential for cover design.
Text to Image for Brochures
Marketing brochures often require polished conceptual imagery.
Example:
Modern electric vehicle charging outside a sustainable corporate office, premium commercial photography, early morning sunlight, vehicle positioned on the left, clean open space on the right for brochure headline and copy.
This prompt already anticipates the page structure.
Text to Image for Annual Reports
Annual reports frequently use conceptual imagery around themes such as:
- innovation;
- sustainability;
- growth;
- digital transformation;
- collaboration;
- global business;
- renewable energy;
- and future technology.
For example:
Abstract visualization of global digital connectivity, sophisticated corporate editorial style, subtle luminous network lines, premium modern aesthetic, wide horizontal composition with clean center area for annual report headline.
Generated conceptual imagery can be particularly useful where literal photography feels too generic.
Text to Image for Book Covers
Book covers provide another interesting use case.
For example:
Solitary lighthouse on a rocky coastline during an approaching storm, cinematic literary atmosphere, dramatic clouds, muted colors, vertical book-cover composition, lighthouse positioned in lower third, clear upper area for title typography.
Again, the prompt includes the intended publishing format.
Text to Image for Travel Publications
Travel publications benefit from visually dramatic imagery.
Example:
Norwegian fjord at sunrise with small hiking figure overlooking the valley, premium travel editorial photography, realistic natural lighting, wide panoramic composition, hiker on the right, open sky on the left for headline.
However, be careful when generative imagery could be interpreted as showing a real destination exactly as it exists.
AI can invent geography and architecture.
If factual representation matters, authentic photography is usually preferable.
Text to Image for Food Publications
Generative AI can create visually appealing food imagery.
For example:
Fresh Mediterranean meal on rustic ceramic plates, premium editorial food photography, soft natural window light, overhead composition, dishes concentrated on the right side with clean table surface on the left for recipe title.
But generated food images can contain unrealistic ingredients or preparation details.
For instructional cookbooks or factual recipes, real photography may be preferable.
Text to Image for Technology Publications
Technology topics are particularly well suited to conceptual generative imagery.
Examples include:
- artificial intelligence;
- cloud computing;
- cybersecurity;
- data networks;
- automation;
- robotics;
- quantum computing;
- digital transformation.
For example:
Abstract visualization of AI agents collaborating across a digital network, sophisticated enterprise technology illustration, dark background with subtle luminous connections, wide editorial composition, negative space on the left for headline.
This avoids trying to photograph an abstract concept.
Creating a Consistent Visual Style
One challenge with generative AI is consistency.
If you generate ten images independently, they may look like they belong to ten different publications.
To reduce this, reuse style language.
For example, every prompt might include:
premium editorial photography, soft natural lighting, restrained color palette, realistic composition.
Or:
minimalist geometric editorial illustration, clean shapes, subtle gradients, sophisticated corporate aesthetic.
The repeated descriptors help establish a visual system.
Create a Publication Prompt Template
For recurring work, create a prompt template.
For example:
[SUBJECT], premium editorial photography, realistic natural lighting, restrained sophisticated visual style, [SUBJECT POSITION], [ORIENTATION], generous negative space [LOCATION] for typography.
Then fill in the variables.
Example:
Female entrepreneur working in a contemporary studio, premium editorial photography, realistic natural lighting, restrained sophisticated visual style, subject positioned on the right, wide horizontal orientation, generous negative space on the left for typography.
This speeds up production and improves consistency.
Generating Backgrounds
Text to Image does not always need to create the main subject.
It can generate supporting backgrounds.
Examples:
Subtle abstract paper texture, warm neutral tones, minimal editorial background, no objects, low visual contrast.
Or:
Sophisticated abstract technology background with subtle geometric network patterns, dark professional aesthetic, low contrast center area for typography.
Background generation can be useful for:
- chapter openers;
- title pages;
- advertisements;
- covers;
- presentation-style layouts;
- and section dividers.
Generating Decorative Illustrations
AI can also create non-photographic elements.
For example:
Minimalist editorial illustration of remote teamwork, simple geometric forms, modern corporate aesthetic, clean white background.
Or:
Hand-painted watercolor botanical border with subtle green leaves, elegant book-design style, white central area for text.
These can become supporting visual elements in a publication.
Text to Image vs Adobe Stock
Should you generate an image or search Adobe Stock?
It depends on the requirement.
Use stock photography when you need:
- authentic places;
- real events;
- real people;
- specific products;
- documentary accuracy;
- historical material;
- or existing professionally produced photography.
Consider generative AI when you need:
- conceptual imagery;
- fictional scenes;
- unusual compositions;
- decorative artwork;
- visual experimentation;
- custom negative space;
- or rapid prototypes.
In many professional workflows, both will coexist.
Text to Image vs Photoshop
Photoshop and Text to Image also serve different roles.
Use Text to Image when you need to create a new visual concept.
Use Photoshop when you need sophisticated control over an existing image.
For example:
Need an entirely new conceptual technology illustration?
Text to Image may be ideal.
Need precise retouching of a client’s product photograph?
Photoshop is likely more appropriate.
Text to Image vs Generative Expand
These features solve different problems.
Text to Image
Creates new imagery from a prompt.
Generative Expand
Extends existing imagery beyond its current boundaries.
Suppose you need a photograph of a futuristic office.
Use Text to Image.
Suppose you already have the right office photograph but it is too narrow for the layout.
Use Generative Expand.
Understanding this distinction helps you choose the right AI tool.
Text to Image vs Generative Fill
Generative Fill modifies selected areas of existing visual content.
Again:
Text to Image: create.
Generative Expand: extend.
Generative Fill: modify.
These three workflows form an important part of InDesign’s generative-image toolset.
Use AI Images as Prototypes
One of the strongest uses of Text to Image is prototyping.
Imagine designing a new magazine before photography has been commissioned.
Traditionally, you might use:
- gray boxes;
- generic stock images;
- temporary photos;
- or Lorem Ipsum.
Generative AI can create more realistic concept imagery.
That allows stakeholders to better understand the intended publication.
Later, the generated images can be replaced by final photography.
AI does not have to create the final asset to provide value.
Don’t Generate Text Inside Images
For most InDesign layouts, typography should remain actual InDesign text.
If you need a magazine cover saying:
Future of Design
do not rely on the image generator to create the title as part of the image.
Instead:
- generate the visual;
- leave appropriate negative space;
- add the title in InDesign.
This gives you control over:
- font;
- kerning;
- tracking;
- hierarchy;
- accessibility;
- spelling;
- editing;
- and print quality.
InDesign should handle typography.
Common Text-to-Image Prompt Mistakes
Mistake 1 — Too Vague
Business office.
There is insufficient creative direction.
Mistake 2 — Ignoring the Layout
A beautiful image can still be useless if the subject occupies the space reserved for the headline.
Specify composition.
Mistake 3 — Too Many Conflicting Instructions
A prompt can become so complicated that the visual objective becomes unclear.
Prioritize the most important requirements.
Mistake 4 — Expecting Exact Factual Accuracy
Generative AI creates plausible imagery.
It should not automatically be treated as documentary evidence.
Mistake 5 — Accepting the First Result
Generate variations.
Comparison is part of the creative process.
Mistake 6 — Forgetting Typography Space
For publication design, negative space is often essential.
Prompt for it explicitly.
When You Should NOT Use AI-Generated Images
Generative imagery is inappropriate for some contexts.
Be cautious with:
News reporting
AI-generated imagery can misrepresent actual events.
Historical documentation
Generated scenes should not be confused with authentic historical images.
Medical publications
Visual inaccuracies can have serious consequences.
Scientific publications
Generated diagrams or specimens may be factually incorrect.
Product catalogs
AI could change important product characteristics.
Legal evidence
Authenticity and provenance matter.
Technical instructions
A plausible-looking generated component may be structurally wrong.
In these cases, authentic or verified imagery is generally preferable.
Review Generated Images Carefully
AI-generated images can contain subtle errors.
Check:
- hands;
- faces;
- reflections;
- architecture;
- shadows;
- object geometry;
- text-like shapes;
- repeated patterns;
- physical relationships;
- logos;
- products;
- and background details.
An image can look convincing at first glance while containing impossible details.
Always inspect at higher magnification before publishing.
AI Image Ethics and Disclosure
Organizations should establish clear policies for generative imagery.
Consider:
- whether AI imagery is allowed;
- whether disclosure is required;
- whether clients approve;
- whether editorial policies permit it;
- whether the subject could be misleading;
- and whether the image could be mistaken for documentary photography.
Responsible use depends heavily on context.
Commercial Use and Adobe Firefly
Adobe positions Firefly for professional creative workflows and has developed its generative AI ecosystem with commercial use in mind.
However, designers should still review:
- Adobe’s current terms;
- intellectual-property considerations;
- trademarks;
- client contracts;
- publication policies;
- and applicable legislation.
Commercial usability does not remove the designer’s responsibility to evaluate the content.
Generative Credits
Adobe uses generative credits for certain AI operations.
The number of credits available and how they are consumed can depend on:
- Adobe plan;
- model;
- feature;
- generation type;
- and Adobe’s current policies.
If you generate images frequently, review the current generative-credit allowance associated with your Adobe plan.
Is Text to Image Included with Adobe InDesign?
Feature availability can depend on:
- InDesign version;
- Adobe subscription;
- Beta or standard release;
- account;
- language;
- region;
- and current Adobe AI policies.
Because Adobe’s AI functionality is evolving quickly, check the latest official information for your specific plan and application version.
Explore Adobe InDesign and Its AI Features
Want to experiment with professional page layout together with Adobe’s expanding generative AI capabilities?
→ View Adobe InDesign plans and current offers
A Complete Example Workflow
Let’s put everything together.
Suppose you are creating a two-page article titled:
The Future of Sustainable Cities
Step 1 — Build the Layout
Create the spread.
Place the headline on the left.
Reserve the right side for the main visual.
Step 2 — Define the Image Requirement
You need:
- futuristic sustainable city;
- realistic rather than science-fiction appearance;
- vertical architecture;
- greenery;
- human-scale environment;
- subject detail concentrated on the right;
- negative space on the left.
Step 3 — Create the Prompt
Realistic sustainable city of the near future with green architecture, trees integrated into modern buildings, pedestrians and clean public transportation, premium architectural editorial photography, soft morning sunlight, sophisticated realistic atmosphere, city detail concentrated on the right side, wide horizontal composition, generous clean negative space on the left for magazine headline.
Step 4 — Generate Alternatives
Compare several results.
Look specifically at:
- realism;
- subject position;
- architecture;
- negative space;
- lighting;
- visual hierarchy.
Step 5 — Test the Image in the Layout
Do not judge the image only by itself.
Place it in context.
Does the headline remain readable?
Does the subject compete with the text?
Does the image support the article?
Does the spread feel balanced?
Step 6 — Refine
If the city is too central, adjust the prompt.
If the background is too busy, request a simpler composition.
If you need additional room, consider Generative Expand.
Step 7 — Add Typography in InDesign
Keep the headline and body copy as real InDesign text.
Apply:
- paragraph styles;
- character styles;
- grid;
- alignment;
- spacing.
The AI creates the image.
InDesign creates the publication.
Step 8 — Review
Before publishing, inspect the generated image for:
- visual errors;
- misleading details;
- inappropriate content;
- trademark concerns;
- and contextual accuracy.
Add appropriate accessibility information where necessary.
Adobe InDesign Text to Image FAQ
Can Adobe InDesign generate AI images?
Adobe has introduced generative image capabilities into InDesign workflows, allowing visual content to be generated from text prompts where the feature is supported.
What powers Text to Image in InDesign?
Adobe’s generative AI capabilities are connected to its Firefly ecosystem.
Can I generate an image directly for an InDesign frame?
The value of integrated generation is that imagery can be created in the context of the layout and frame requirements, subject to the workflow available in the current version.
Can I specify where the subject should appear?
You can include compositional instructions such as “subject on the right” or “negative space on the left” in your prompt, although generative results can vary.
Can Text to Image create magazine images?
Yes. Conceptual editorial imagery is one of the strongest potential uses, provided AI-generated content is appropriate for the publication.
Can I generate book-cover images?
Yes. Prompts can specify vertical compositions, subject positioning, atmosphere, and negative space for title typography.
Should I generate typography as part of the image?
Usually no. Generate the visual and add typography separately in InDesign for better control, editability, accessibility, and quality.
Is Text to Image the same as Generative Expand?
No. Text to Image creates new imagery, while Generative Expand adds visual content beyond an existing image’s boundaries.
Is Text to Image the same as Generative Fill?
No. Generative Fill is designed to modify selected portions of existing visual content.
Should I use AI-generated images for journalism?
Use extreme caution. Generated imagery can create scenes that never existed and should not be presented as authentic documentation of real events.
The Bigger Opportunity: Generate for the Layout
The most interesting part of Text to Image is not image generation itself.
Thousands of AI tools can generate images.
The interesting part for InDesign users is the relationship between generation and layout.
A designer already knows:
- the frame dimensions;
- headline position;
- visual hierarchy;
- page orientation;
- typography requirements;
- and desired composition.
That information can become part of the prompt.
Instead of searching endlessly for:
an image that fits the page
you can increasingly generate:
an image designed to fit the page.
That is a fundamentally different creative workflow.
Final Thoughts
Adobe InDesign Text to Image gives publication designers another way to source visual content.
It does not eliminate:
- photography;
- illustration;
- Adobe Stock;
- Photoshop;
- or professional art direction.
Instead, it adds generative AI to the toolkit.
The most effective InDesign prompts go beyond describing the subject.
They describe the layout requirement.
Instead of:
Businesswoman in an office.
try:
Businesswoman working in a contemporary office, premium editorial photography, soft natural daylight, subject positioned on the right side, wide horizontal composition, uncluttered negative space on the left for headline typography.
That final phrase can make the difference between an attractive AI image and an image that actually works in an InDesign document.
The goal is not simply to generate better images.
It is to generate more useful images for publication design.
Try Adobe InDesign
Explore professional page layout, typography, publishing, and Adobe’s expanding Firefly-powered generative AI workflows.
→ Get Adobe InDesign and view the latest Adobe offer
Continue the InDesign AI Series
Next:
How to Write Better AI Image Prompts for Adobe InDesign
Also explore:
- Adobe InDesign AI: The Complete Guide to AI Features and Workflows in 2026
- Adobe InDesign AI Features: Everything You Can Do with Generative AI
- Adobe Firefly in InDesign: How the Integration Works
- Adobe InDesign AI Assistant: A Complete Guide
- 50 Useful Prompts for Adobe InDesign AI Assistant
- Adobe InDesign Generative Expand: A Complete Guide
- Adobe InDesign Generative Fill: A Complete Guide